
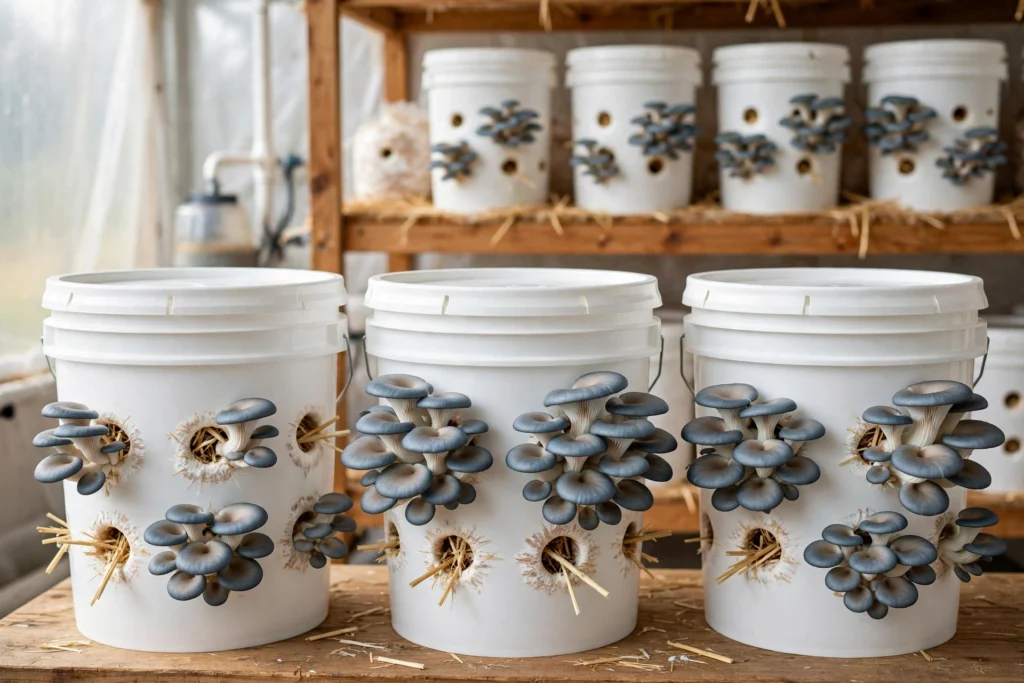
Mushroom growing buckets wholesale means buying food-grade 5-gallon HDPE buckets in bulk for “bucket tek” — the method of growing oyster mushrooms in drilled buckets filled with pasteurized straw and grain spawn. A single 5-gallon bucket yields roughly 1–3 pounds of oyster mushrooms per flush, with a second and often a third flush, and the method scales from a dozen buckets in a spare room to hundreds servicing restaurants and farmers’ markets. This guide covers the bucket specs, hole pattern, spawn rates, and bulk ordering that commercial growers need.
The bucket is the cheapest piece of equipment in a mushroom farm, and the one that decides whether the farm scales. North Spore — now one of the largest mushroom spawn suppliers in the US — began as an urban mushroom farm that grew 100% of its mushrooms in buckets, scaling from 5–10 buckets a week to hundreds, enough to service dozens of restaurants and multiple farmers’ markets. The reason is simple: a 5-gallon bucket costs a few dollars at pallet pricing, stacks on a shelf, survives hundreds of cycles, and produces a predictable crop on a predictable schedule. This guide is written for commercial mushroom growers, urban farms, grow shops, and farmers-market producers buying mushroom growing buckets wholesale. It covers which bucket to buy, how to prep it, the spawn and substrate math per bucket, and how to size a bulk order.
What Is Bucket Tek — and Why Commercial Growers Use It
Bucket tek is the technique of growing mushrooms — almost always oyster mushrooms — in a 5-gallon bucket drilled with holes and packed with pasteurized substrate and spawn. The mycelium colonizes the substrate inside the bucket, then fruits out of the holes in dense clusters. It is, in North Spore’s words, one of the most reliable methods to grow oyster mushrooms quickly and on a predictable schedule, and it is sustainable, beginner-friendly, and easy to scale up.
For a commercial grower, buckets beat the alternatives on three counts. Grow bags are single-use: every harvest ends with a bag in the trash and a new bag to buy, pack, and sterilize. Monotubs cost far more per unit and take up more shelf space per pound of yield. Buckets are reusable for season after season, stack neatly on grow-room shelving, and hold their shape under the weight of wet straw. A grower running 200 buckets a week burns through spawn and straw, not buckets — the bucket is a one-time capital purchase amortized over dozens of flushes. That is the economics that makes wholesale bucket buying worth doing properly.
The Right Bucket for Mushroom Growing: Specs That Matter
Not every 5-gallon pail is a mushroom bucket. Specify these four things before ordering: virgin food-grade HDPE (resin code #2) — the bucket touches food you will sell, so it must be molded from virgin, FDA-compliant, BPA-free HDPE, the same standard as any food-contact container. For the full breakdown of what makes a bucket genuinely food grade, see our guide on HDPE buckets food grade explained. Never grow in a used bucket unless you know exactly what it held — a pail that carried paint, chemicals, or solvents can leach residue into the substrate, and no amount of washing makes it safe for food. Heavy-duty walls, about 90 mil — a thick wall survives the drill, the stacking, and the repeated wash-downs between cycles; thin household pails crack at the holes and split under a full load of wet straw. A tight-fitting lid — the lid stays on through colonization to hold humidity in, and it must seal well enough that the substrate does not dry out. A matching snap lid is standard; a gamma seal lid is the upgrade for airtight storage of dry spawn and substrate ingredients between batches (see our gamma seal lids guide). A sturdy handle — a full 5-gallon bucket of wet straw is heavy, and crews move dozens of buckets a day between the prep area, the incubation room, and the fruiting room.
Comparison Table: Mushroom Growing Buckets Wholesale Options at a Glance
| Bucket | Best mushroom-growing use | Capacity | Why wholesale buyers choose it |
|---|---|---|---|
| 5-gallon HDPE bucket, food-grade | Bucket tek production — the standard | ~20 L of straw + spawn | The industry standard; North Spore scaled on this exact size; stacks on shelving |
| 2-gallon HDPE bucket, food-grade | Trials, small-batch varieties, home-grow kits | ~8 L of straw + spawn | Cheap way to test a new strain before committing a full 5-gallon run; see our 2-gallon buckets in bulk |
| 3.5-gallon HDPE bucket, food-grade | Mid-volume runs, single-variety batches | ~13 L of straw + spawn | A lighter lift than 5 gallons for crews moving buckets daily |
| 6-gallon HDPE bucket, food-grade | High-volume oyster runs, fewer buckets per crop | ~23 L of straw + spawn | Fewer buckets to prep, drill, and wash per pound of mushrooms |
| Square 5-gallon HDPE bucket, food-grade | Shelf-dense grow rooms, palletized shipping | ~20 L of straw + spawn | Square footprint packs tighter on shelves and pallets than round |
Preparing the Bucket: Holes, Drilling, and Cleaning
A mushroom bucket is a plain 5-gallon bucket with one modification: holes. Using a ½-inch drill bit, drill holes in a diamond pattern around the full circumference of the bucket — large enough for mushrooms to fruit from, but not so large that the substrate dries out while it colonizes. GroCycle recommends holes 0.4–0.6 inches (10–15 mm) across, spaced 4–6 inches (10–15 cm) apart, with a few smaller holes in the base for drainage. Deburr every hole with a razor or knife so jagged plastic does not tear the mycelium or snag during harvest, then wash the bucket and lid well with warm soapy water.
Before the first fill, sanitize: wipe the inside with 70% isopropyl alcohol, or dunk the bucket in water treated with a little bleach, and let it dry. Cover the holes with micropore tape during colonization — the tape breathes, holds moisture in, and keeps fungus gnats out — and remove it when fruiting starts. Label every bucket with the date, the variety, and the substrate: at commercial scale, an unlabeled bucket is a lost data point, and the label is how you learn which strain and spawn rate paid off.
Substrate and Spawn: The Math Per Bucket
The bucket is the container; the crop is straw and spawn. The standard substrate is chopped wheat, oat, or barley straw — cheap, easy to pasteurize, and resistant to mold — or sugarcane bagasse, whose small particle size gives good air exchange. Cut straw to pieces under 2 inches long, or buy pre-chopped straw from a farm supply store. Hardwood pellets are the alternative for species beyond oysters, such as lion’s mane: hydrate them with lime water to pH 12.5 until they break down into moist sawdust at field capacity.
Pasteurization is what gives the oyster mycelium a head start over mold and bacteria, and the low-energy method is a cold lime bath: hydrated lime (calcium hydroxide) dissolved in water to raise the pH. North Spore recommends 6 grams of hydrated lime per gallon of water, bringing the bath to pH 12.5, with the straw submerged overnight for at least 12 hours. GroCycle uses 2 grams per liter to reach pH 11–13, soaking 16–20 hours. Use only low-magnesium, high-calcium lime — builders’ lime or pickling lime — with magnesium below 5%; high-magnesium or dolomitic lime stunts mushroom growth. Drain the straw until it reaches field capacity: squeeze a handful and only a couple of drops of water should come out. Oyster mushrooms want substrate moisture of at least 50%.
The spawn rate is the number that decides yield and speed. Use grain spawn at 5–10% of the substrate weight — 2.5–5 pounds of grain spawn per 5-gallon bucket. North Spore’s rule is a single 5-pound bag of grain or sawdust spawn per 5-gallon bucket of chopped straw, and you can get away with 2.5 pounds if you must. Beginners and commercial growers alike should err on the side of more spawn, not less: the spawn rate directly drives how fast and how reliably the bucket colonizes. Layer the bucket like a lasagna — straw, a thin layer of spawn, more straw — packing firmly, and finish with a straw layer on top.
Colonization and Fruiting: The Timeline a Buyer Should Plan Around
Colonization takes 10–21 days. Put the capped bucket in a warm, dark place — ideally a steady 64–75°F (18–24°C), which for most operations is room temperature — and in about two weeks the straw turns completely white with mycelium. Colonizing buckets run warm to the touch and smell sweet, like anise; if buckets are stacked too close together, the heat can cook and kill the mycelium, so leave air gaps between them. Pink oysters need colonization temperatures above 60°F, while cold-tolerant blue oysters prefer it cooler, so confirm the requirements for the strain you grow.
Fruiting starts when pins — small clusters of mushroom-shaped structures — poke through the holes. Move the bucket to indirect light with good airflow and high humidity: mist the holes 2–3 times a day, or drape a loose plastic bag over the bucket to hold moisture. Most oyster strains fruit best between 50–80°F. Pins appear within about a week of colonization finishing, and in the five to seven days after pinning, the mushrooms double in size every day, reaching full size in under ten days. Harvest when the edges of the caps begin to flatten and curl upward — just before the mushrooms release their spores — by slicing whole clusters off against the bucket with a sharp knife. Store fresh oysters in a paper bag in the fridge for 5–7 days. After harvest, leave the bucket in a shady, humid spot, keep misting, and expect a second and often a third flush over the following weeks.
Size-Selection Guide: Match the Bucket to the Grow
Buy by the crop plan, not by the bucket. For production oyster runs, the 5-gallon bucket is the default: it is the size every major grower guide is written around, it holds enough straw to buffer moisture and temperature, and one bucket yields roughly 1–3 pounds per flush. For strain trials and grow-kit sales, step down to a 2-gallon bucket: a small batch of a new variety costs one bag of spawn instead of five, and 2-gallon buckets make a tidy retail grow kit for customers. For high-volume single-variety runs, the 6-gallon bucket cuts the number of buckets to prep, drill, and wash per pound of mushrooms. For shelf-dense grow rooms, square 5-gallon buckets pack tighter than round ones on the same shelving. And for substrate prep at scale, keep a few undrilled 5-gallon buckets as pasteurization and mixing vessels — the lime bath and the layering both happen in buckets before the fruiting buckets are ever filled. For the smaller size in detail, see our guide to 2-gallon buckets in bulk, and for the standard production size, see our 5-gallon buckets.
Buying Mushroom Growing Buckets Wholesale: What to Ask Your Supplier
Mushroom buckets are a capital purchase, not a consumable: a grower buys them once and reuses them for dozens of cycles, so the order is about getting the spec right, not about chasing the lowest per-unit price. Before placing a bulk order, confirm these details: Minimum order quantities and pallet counts — suppliers like ThoseBucketPeople sell in pallet quantities, which drops the per-unit price well below retail and stocks a whole grow room from one order. Resin and food-grade certification — specify virgin HDPE, FDA-compliant, BPA-free in writing, with the resin code molded into the bucket, so every delivered pail is safe for food production. Wall thickness — ask for 90-mil heavy-duty walls, because thin pails crack at the drilled holes and fail under wet straw. Lid type per job — snap lids for fruiting buckets, gamma seal lids for airtight storage of grain spawn and dry substrate ingredients; order lids with the buckets, because mismatched lids are the number-one bucket complaint on any crew. Handle strength — metal handles with reinforced mounts, because a full bucket of wet straw is a real load and crews move dozens a day. Color-coding — one color per strain or per room, so a blue-oyster bucket is never confused with a pink-oyster bucket on the fruiting shelf. Delivery and freight — pallets stack and ship efficiently, but confirm freight to the farm or warehouse before ordering, and ask about volume pricing for your actual quantities rather than paying list price.
Cleaning, Reuse, and Retirement: A Bucket That Pays for Itself
A mushroom bucket earns its keep by surviving cycle after cycle. After the last flush, empty the spent straw — it makes excellent compost or garden mulch, which is why many growers pair bucket tek with the composting setups in our guide to buckets for gardening and composting — then rinse the bucket with clean water and let it dry fully before stacking, so bacterial film does not build up between cycles. Sanitize with 70% isopropyl or a dilute unscented cleaner before the next fill, and rinse thoroughly; scented soaps and bleach residue can stunt the next colonization. Inspect the holes each cycle: a cracked rim or a split wall is a contamination risk and a structural failure waiting to happen under a full load of wet straw. Retire buckets that are cracked, deeply gouged, or warped — damaged plastic harbors bacteria and fails under load. And never repurpose a bucket that held chemicals, paint, or solvents for mushroom growing, no matter how well it was washed: if you do not know what a used bucket held, do not grow food in it.
Frequently Asked Questions
What size bucket is best for growing mushrooms?
A 5-gallon food-grade HDPE bucket is the standard for bucket tek: it holds enough straw to buffer moisture and temperature, yields roughly 1–3 pounds of oyster mushrooms per flush, and stacks on grow-room shelving. Use 2-gallon buckets for strain trials and grow kits.
How many holes do I drill in a mushroom bucket?
Drill ½-inch holes in a diamond pattern around the full circumference, spaced 4–6 inches apart, plus a few smaller holes in the base for drainage. The holes are where mushrooms fruit and where fresh air enters during colonization.
What kind of bucket is safe for growing mushrooms?
A new, food-grade bucket molded from virgin HDPE (resin code #2), FDA-compliant and BPA-free, with about 90-mil walls. Never grow food in a used bucket unless you know exactly what it held before.
How much spawn do I need per 5-gallon bucket?
Use grain spawn at 5–10% of the substrate weight, which is 2.5–5 pounds per 5-gallon bucket. One 5-pound bag per bucket is the safe standard; more spawn colonizes faster and more reliably.
How long does it take to grow mushrooms in a bucket?
Colonization takes 10–21 days at 64–75°F, then pins appear within about a week and reach full size in under ten days. From inoculation to first harvest is roughly 3–5 weeks, with a second and often a third flush after that.
How many pounds of mushrooms does one bucket produce?
Grower guides report roughly 1–3 pounds of oyster mushrooms per flush from a 5-gallon bucket, with 2–3 flushes per bucket. Yield depends on the strain, the spawn rate, and how well humidity is maintained during fruiting.
Can I reuse mushroom growing buckets?
Yes — that is the point. A heavy-duty food-grade bucket survives dozens of cycles. Empty the spent straw (it composts well), rinse, dry fully, sanitize before refilling, and retire any bucket that is cracked or warped.
Get Mushroom Growing Buckets in Bulk from ThoseBucketPeople
Whether you run a commercial mushroom farm, an urban grow operation, a grow shop, or a farmers-market stall, we supply the food-grade buckets mushroom growers actually use — 5-gallon buckets for production runs, 2-gallon buckets for trials and grow kits, and lids to match, in pallet quantities with nationwide delivery. Request a quote through our Get a Quote page or contact us for volume pricing and delivery options.